Wednesday, May 31, 2006

my favorite new skill

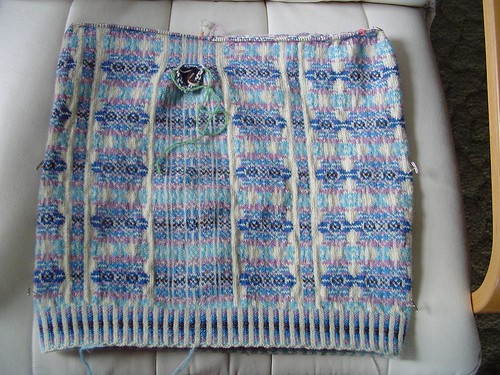
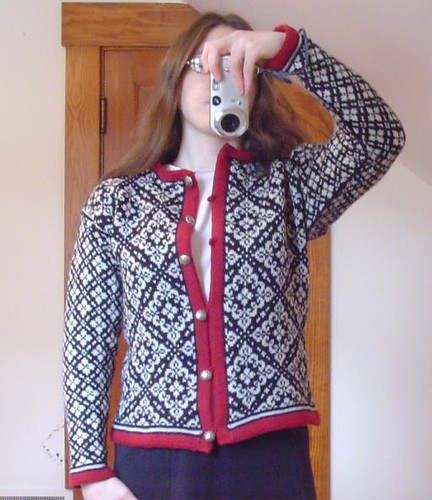
Crocheted steeks rock. It's a lot quicker and less fiddly than I anticipated. So far I've done the neck steek and one of the armholes, using leftover Wildfoote sock yarn. (Sparkly purple - enough contrast that I can see it well when crocheting with it, but similar enough to the sweater colors that it wouldn't look out of place if you caught a glimpse of the inside of the sweater.)

I decided to use the Schoolhouse Press method, which meant using slipped stitch crochet stitches (instead of single crochet), and going up the left side and down the right side. I interpreted the advice for securing the bottom and top stitches in the steek sections (the cast on row and live stitches at the top) as best I could. There's a technique described in Sweaters From Camp that involves grafting the live stitches at the top, but I wasn't clear on how that would really help me, or how it would act when I made the cut. I decided it would work if I just crocheted into those live stitches at the top, which for me was three stitches on either side of the center stitch that was to be cut. It seems to have worked just fine.

All of the photos have notes in Flickr, so if you're confused about what part of the photo is what, click on through to the Flickr page.

VS, 5/31/06, crocheted armhole steek
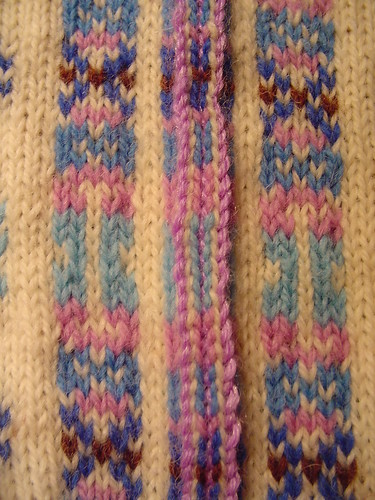
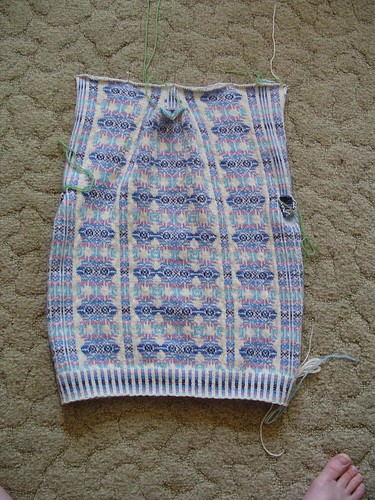
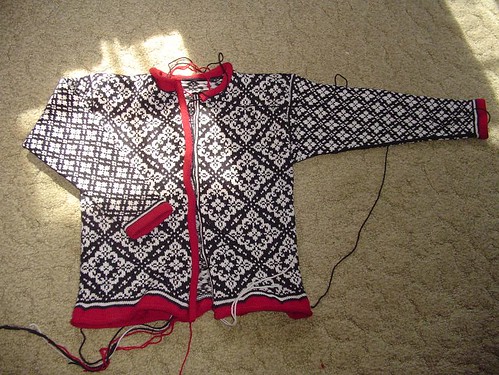
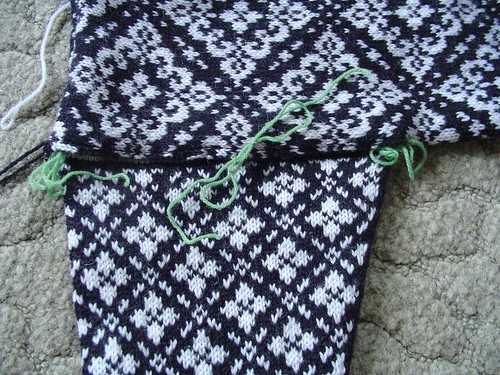
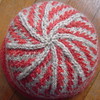
Post-crocheting, pre-cutting

VS, 5/31/06, cutting an armhole steek
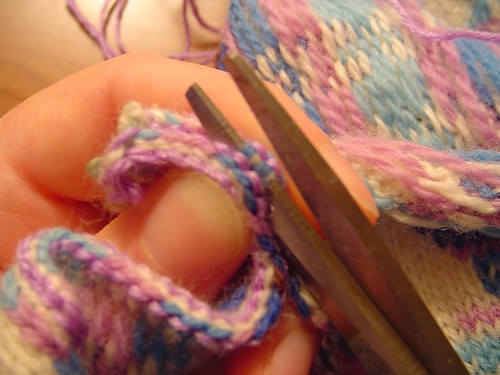
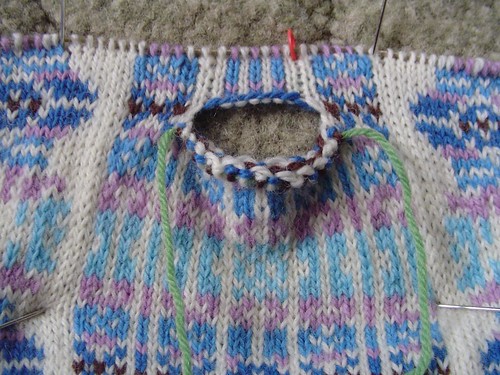
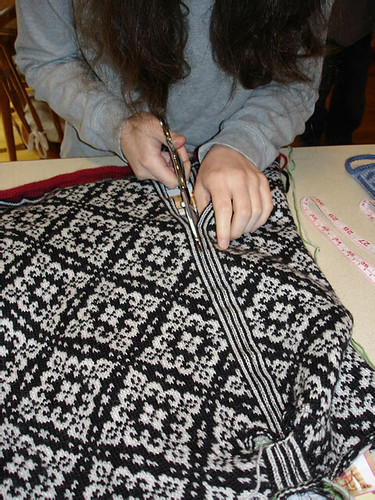
I didn't cut more than 2 stitches at a time. I wanted to make sure that I didn't even come close to cutting the crochet.

VS, 5/31/06, corner of a cut steek
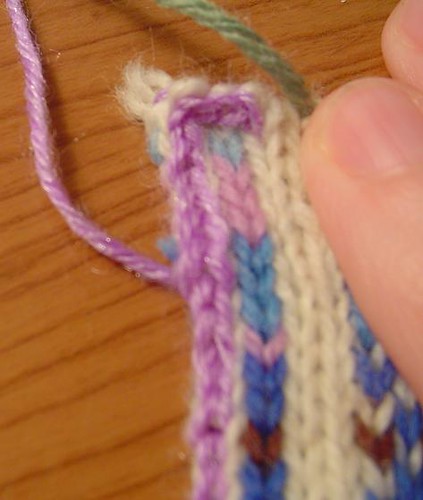
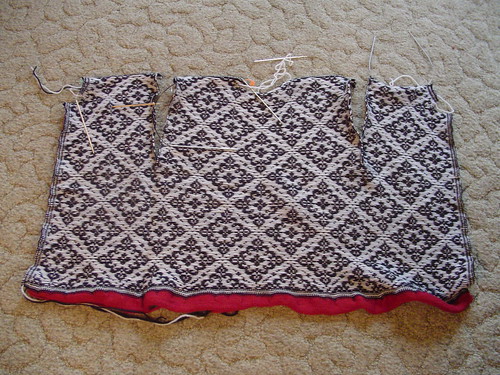
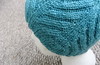
This is the top right corner of an armhole steek. You can see how I started crocheting at the top right edge of the steek stitches (into the live stitch loops at the top), then made a 90 degree turn and crocheted down the steek.

VS, 5/31/06, cut steek from the inside and outside
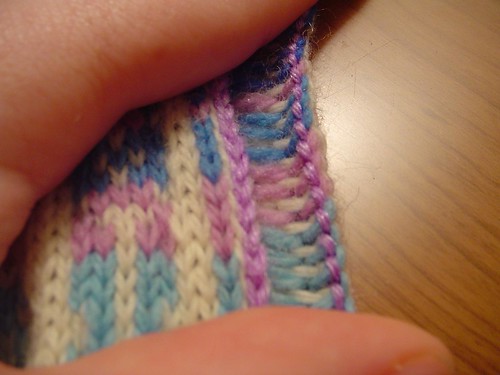
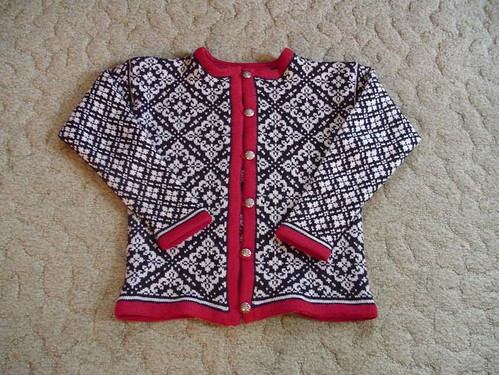
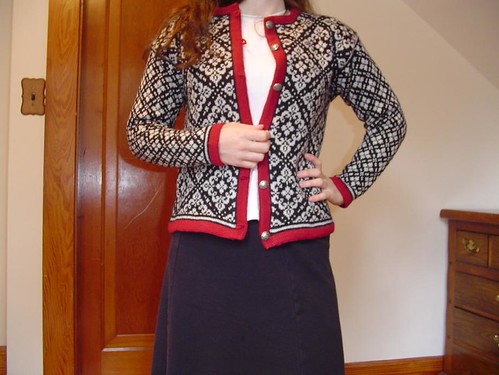
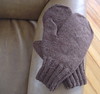
The right side and wrong side of the cut fabric, showing what the crochet looks like from either side. Neat, pretty, and secure!


(The more I type the word "crochet", the weirder it looks.)

Tuesday, May 30, 2006

Palette request; finished socks; new sock ramblings

Before I get on with the meat of the post, I'm going to take Anne's advice, and post a yarn SOS. If any of you have Knitpicks Palette in Cream, dyelot 8107, would you be willing to trade a skein of it for something else? (I should have a full skein leftover of 2 or 3 of the other colors I'm using in the Vertical Stripes sweater, and have plenty of other stuff I could trade, too.) This is the color I may run out of for the sweater. I'm only really interested in a trade if someone happens to have this specific dye lot, since it would be pretty easy and cheap to order another skein (most likely in a different dye lot) from Knitpicks, if I needed to. So if you've got one, and are interested in a trade, drop me a line.

My fourth and final (for a while, anyway) pair of Retro Rib socks is done. Long live the Retro Ribs!

Retro Rib socks, May 30, 2006
(Can you tell I didn't make them for my own little feet?)


Retro Rib socks, by Evelyn Clark
Interweave Knits Winter '04
Patons Kroy sock yarn (2 skeins)
2.25 mm DPNs

I love this pattern. It's easy to memorize, much more interesting to knit than plain stockinette or ribbing, but not complicated enough to distract one from a good movie or podcast. It divides easily onto 4 DPNs, and the nature of the pattern repeat makes it extremely easy to find your place. It also means that it's a breeze to make sure sock 2 matches sock 1 exactly. And then there's the ribbing, which means the fit is very flexible. The perfect sock pattern? It just might be. However, after 4 pairs, I'm a bit tired of it, so there may be a Retro Rib hiatus for a while. On the other hand, it's still more interesting than plain stockinette or ribbing, so maybe it will make another appearance sooner than I anticipate.

I started the Hedera socks today. I decided to use size 2 DPNs for the ribbed cuffs. My default number of stitches for socks on size 1 needles is 64, not the 60 in the pattern. The pattern is written for 2.5mm needles, which are larger than my 2.25 size 1 needles. I figured it would be worth it to use the 2.75 mm size 2s for the cuff, so I have the flexibility of making the socks really long, if I wish. I was left with tons of leftover yarn with my first 2 pairs of Lorna's Laces socks, so I know I could make these really long, if I wished. Oh, and another thing that pushed me to use the larger needles for the ribbing is that it's really humid here, which I think tightens up my gauge a bit. Stuff just doesn't glide as easily, which is a good recipe for throwing off gauge.

Someone asked what colorway I'm using for the socks. The name of the colorway is "Fall Flight", but I'm not sure if it's made anymore. This sock yarn was generously sent to me by Wendy, when she did her sock destashing several weeks ago. I googled the colorway, to see what it looks like knit up, but had little success finding examples. I'd wager that it was in Wendy's stash for a while. Another clue to the age of the colorway is the fact that it's one of the bi-color colorways. The newer LL sock yarn I've used has had about 4 main colors per skein. This one only has 2, meaning the striping tends to be every other row. I'm not sure if LL changed the way they put together colorways at some point, but I get the feeling that their yarn like this is the older stuff. Long story short, I have a feeling it may be difficult to find this colorway in stores, if you were thinking of tracking it down.

Wow, that was a lot to write about socks that are only a couple of inches long. For the record, I'm still not sold on them yet. I've only done 2 or 3 pattern repeats, and it's hard to tell whether I like the way the striping is working with the lace pattern. I think it's starting to grow on me, but it's hard to tell. I think I'll probably continue with this yarn, because it's the type of striping that is bound to look busy, no matter what stitch pattern you use it with. I think I prefer a busy lace pattern to wild thin stripes in plain stockinette. Regardless, it's really awesome to work with LL again. I love the stuff.

Monday, May 29, 2006

now for the less criminally insane stuff

Using about 3/5 (which, if you remember third grade math, you will know is less than 2/3!) of my third of four skeins of cream colored yarn, I finished the Vertical Stripes body! Whoo! Of course, I still have to use more of that yarn to do the three needle bindoff for the shoulders. And let's not even start in on whether my dinky scale is accurate within more than, say, 5 grams. For now, I'm just happy that the body is (finally) done, and that I should have enough yarn of the same dye lot to at least knit the sleeves to the beginning of the cuffs.

Vertical Stripes - May 28, 2006


I guess the next steps are to crochet and cut the steeks, do a three needle bindoff for the shoulders, and then do a primary blocking. Most of the blocking I want to do is for width (which will simultaneously un-pucker the fabric), which is nice. I think I'm going to do a quick and dirty initial blocking before I start on the sleeves because, in theory, it would be nice to try on the sweater while I'm working on the sleeves. If I want to do that, it will be nice to have a sweater that is fairly accurate in circumference, so the sleeves act as they will when they're done, giving me a more accurate measure of how they're progressing in relation to my arms.

I plan to use the crochet method to secure the steeks, and have reread the section in Sweaters From Camp that covers it, as well as Eunny's description. They methods differ in a few ways, and I'm not sure yet which I'll use. Off the top of my head, the differences are chains vs. single crochets, and the direction to work in. SFC also describes a method to help secure the stitches across the entire bottom and top of the steek sections, though the photos are far from clear, so that's something I'll probably have to work out on my own.

I assume I'll start on the crocheting this week. Right now, I'm focusing on finishing a pair of socks that have been on the needles way too long. I'm tired of the socks, and am itching to cast on for Hederas in Lorna's Laces.

Sunday, May 28, 2006

The Amazing Lace: meet (part of) the team

(Note: This is my entry in the first Amazing Lace challenge of the summer. It is silly, and contains little to no technical information or actual knitting. This is not a usual blog entry. If this sort of silliness isn't your thing, don't bother reading the rest of this blog entry. If this is the first time you're reading my blog, please believe that I'm not an evil person. Most of the time...)

This will be the team you love to hate. You know - the abusive relationship. One member of the team is always the boss, dictating what the other one will do, how they will do it, and whether or not they get to whine about it. I'm the arse. I'm the one willing to leave my partner stranded on the side of the road (without a map) in rural Laos or Peru while I flit off with my new, more attractive partner. Such is life, right?

Okay, neither I nor any of my knitting will be traveling to Laos or Peru this summer. We'll be lucky if we make it to such faraway and exotic places as Vermont. Heck, we'll be lucky if we make it out of Cheshire County, New Hampshire. But I do plan to be bossy and flighty with my projects partners. I will not be apologetic. For your entertainment (and pity) here is my first lace partner for the summer, getting advice from past victims knitting partners. (And boy were they eager to line up to dish the dirt.)

Sock Lineup


My partner's preparation has involved being spun in a circle until it cowered in a nice, compact little ball (boy was that fun!), and hearing tales of horror from past socks. Ya know, the usual stuff: being thrown around in plastic bags, having spare needles stuck through their bodies, having their noses sewn shut when I was done with them, etc. To heighten the suspense, it's not even clear which yarn will get the pleasure (and pain) of being my first lace partner for the summer. I'm planning to knit the Hedera socks from the latest Knitty. I'll start off with the Lorna's Laces, but if I find my partner (and her stripes) too troublesome for that pattern, I'll use the plain orange instead.

When I'm done with that partner, I'll stick it in a hot, stuffy drawer, and cast on for a glorious lace project that would put it to shame. Will I feel guilty about abandoning my partner halfway through the summer? Nah. I'm in this thing for me. I will twist that yarn to my will. And I will laugh maniacally all the while.

Wednesday, May 24, 2006

SFCKAL Week 15

subtitle: the Vertical Stripes update

Only updates from me and TJ today. She finished the body of her Vertical Stripes cardigan! Whoo! It looks great, and fits like a pillowcase. ;-)

I'm ever so close to doing the same. I did the neck shaping calculations yesterday, and just put neck stitches on a holder and formed the front neck steek. I have about 20 rows of knitting to go, and am hoping I'm able to stretch everything out to fit on my 32" circular needle. I think it's going to work, but it will be tight and annoying for a while. But not annoying enough to spend $13 on an Addi Turbo with a shorter cord, just to knit a few rows.

Uh, so that's it for the SFCKAL update. I'm thinking of doing these updates every other week, instead of every week. I know the sweaters are slow going, and that they'll probably be even more slow going for a lot of people during the summer months. So unless there's some grand objection to the idea, look for the next update 2 weeks from today, not next week. I think they'll be more interesting to read if there's more than one or two sweaters to report on each time, eh? ;-)

I'll try to get a photo up of my sweater body when it's done, but it may have to wait a few days. (A. is on vacation, so I'm going to be spending more time with him, which is a very good thing.) But I've already taken a photo for my entry in the first Amazing Lace contest, so look for that within the next several days, too. I just need to come up with something clever to say...

EDIT: I misspelled "stripes" as "strips" both times I typed it above. This gives me a whole new idea for a non-work-friendly photo contest at the end of the knitalong. But maybe that wouldn't be such a good idea. ;-)

Monday, May 22, 2006

no longer delusional

I had fantasies of finishing the Vertical Stripes body this weekend. I must have been delusional. A row takes me about 20 minutes, and my row gauge is about 10 rows per inch. You can do the math.

I did make a lot of progress. Look!

Vertical Stripes sweater, May 22, 2006
Ignore the measuring tape. I had it there for a sense of scale, but as it wouldn't stay in place, the measurement is wrong. The body is 18".


I'm aiming for about 8 pattern repeats (25 rows per repeat) for the body, which means I have about 1.5 to go. When I finish the 7th repeat, I'll sit down with a pencil and paper and figure out the neck shaping.

Thanks to TJ, Anne, and an anonymous commenter, I'm feeling better about yardage. I still know that I should have more to work with than I do (or rather, should have had to buy more yarn if I were planning to make the sweater as sized in the book), but it's possible that I'll make it with what I have. It turns out that I was probably wrong about the half and half thing. The sleeves should take 1/3 the yardage of the body, not 1/2. Perhaps I once heard that they take 50% of the body yardage, and misremembered that as 50% of the total yardage, which are obviously two very different figures.

At this point, I've started on the third of four balls of cream yarn. According to the math, I can use 2/3 of this ball for the body, and theoretically still have enough for the sleeves. I think I'll come in under 2/3 of this ball for the body, so I'll probably start the sleeves with the yarn I have instead of ordering more. But I'm not going to let myself obsess too much, and won't allow myself weigh the ball until the body is done. Assuming it works out, I'll probably put the first sleeve on scrap yarn when I get to the point where I'd start the corrugated rib cuff. If anything, I think I could get away with potential dye lot differences in the cuffs and collar, since corrugated ribbing changes the appearance of the yarn so much anyway.

Wednesday, May 17, 2006

SFCKAL week 14; fibbing and gloating

SFCKAL


Here's a new photo of my Vertical Stripes pullover, with about an inch more than Monday's photo. See the puckering? Told ya I wasn't perfect! (Yes, it will block out.)

Vertical Stripes sweater, May 17, 2006


I did the math again last night, and realized that I did not miscalculate how much yarn I was supposed to need. In fact, according to what's listed in the pattern, I should have plenty of extra yarn. I ordered more than enough yardage according to the pattern, and should actually use a good deal less than that, since I'm using a much tighter gauge to knit a sweater that is smaller in both length and circumference. Yet, I'm still pretty sure I'm running out. I'm very close to halfway through the cream yarn, yet only about 2/3 through the body of the sweater. Correct me if I'm wrong, but I was under the impression that a good heuristic for calculating yarn need for sleeves is that both sleeves together use about as much yarn as the whole body. If that holds true for this sweater, I don't have enough.

Last night, after I redid the calculations, I decided to weigh my yarn. I thought that perhaps the skeins I ordered were short. While I obviously can't weigh the skeins I've already knit into the sweater, the remaining skeins are the correct weight, and thus presumably have the full yardage listed. So I'm either vastly overestimating the amount of yarn I'll need for the sleeves, or the amount of yarn needed is not correctly listed in the pattern. TJ, how are you doing on yardage?


fibbing and gloating
A few weeks ago, the Knitting Curmudgeon held a contest. She challenged us to write "fibs" (poems based on the Fibonacci Sequence, using syllables per line as the unit of measurement). I entered the contest, and while I didn't win, yesterday she posted the folks who made the top 10. I was very pleasantly surprised to see that I made it! I only submitted one, as the contest coincided with when my computer died, and I didn't have the time or patience to write the dozens I envisioned myself cranking out. Probably for the best. Mine is the first one on the PDF in this post. I didn't win anything, but as they say, it's an honor just to be nominated. ;-)

(Fun trivia: Blogger's spell checker knows the word "Fibonacci", but not the word "blogger".)

Monday, May 15, 2006

armpits!

Thanks for all of the flattering Ingeborg comments! What an overwhelming response. To answer some questions:
  • I believe I ended up with about 2" of ease in the final sweater. That means it was smaller than the smallest size in the book, and definitely smaller than what seems to be traditional. I like it that way. I'm fairly small on top, and have hips that are about the same measurement as my bust, so this worked out well for me. I'd imagine that someone who has a larger chest measurement, or hips that are wider than their bust, would want to go with a little more ease with this sweater, even for a close fit.
  • Someone asked about Naturespun. I love the stuff. Okay, I've only worked extensively with the sport weight, though I did use the worsted weight for the body of a pocket creature. (I loved knitting with it for that, but can't really attest to long term wear from that project. I've heard it's pilly when knit loosely but not when knit tightly, for what it's worth.) This is the third project I've used the sport weight for, though, and really can say with a lot of confidence that the yarn is wonderful. I really loved the stitch definition I got when I used it for Elizabeth I. I also used it for Nordic Mittens, which look almost new after being worn all winter. No pilling or fading at all. The yarn also softens up a great deal after washing. It's not all that scratchy to begin with, but after a long Eucalan bath, Ingeborg is very soft. I'm not a fan of Lamb's Pride, but Naturespun is definitely my favorite basic yarn. And it doesn't hurt that it's very reasonably priced.

Okay, now that the Naturespun commercial is over, I have new knitting to talk about! Or rather, progress on old knitting. I knit a bunch on the Vertical Stripes sweater this weekend, and decided to create the armhole steeks at around the 13" mark, about halfway through the 4th pattern repeat. I actually ended up tinking a row and a half (that's about 500 stitches - eek!), because I accidentally created one of the armholes off-center. 21 stitches on each side (the middle three stripes in each of the side stripe sequences) are put on scrap yarn, to later be worked as the bottoms of the sleeves. (Sleeve decreases are done on either side of that stripe sequence, which is pretty nifty.) I was off center on one of those, and the only way to really fix it was to undo the row and a half I had knit before I realized this. I'd probably be done with the 4th pattern repeat by now if I hadn't had to do that, but it was well worth the effort. Here's a photo of what that area of the sweater looks like now, with the baby armhole steek finally in progress:

Vertical Stripes - beginning of armhole steek, May 15


According to the quick and dirty calculations I did in my head just now, I think I'll need a total of about 7 pattern repeats (about 3 more to go) for the sweater body. Of course, I'll make sure to use a tape measure as I go along to verify that. I've already screwed up at least one calculation on this sweater, as it's crystal clear that I didn't buy nearly enough cream colored yarn. I have plenty of the other colors, but can't figure out how I made such a silly mistake when figuring out how many skeins of the cream to buy. So there may be quite a delay when I'm done with the body, while I wait until I can buy more yarn for the sleeves. I don't think there's any way I'll be able to get the same dye lot, so I'd prefer that the entirety of both sleeves come from the same new dye lot, to decrease the risk of anything looking too wonky.

I've started to think about what I'm going to do for the collar. In the book, there are two rows of icord edging for the neckline treatment. (Though I can only see one row in the book.) I think the sweater might look nicer with corrugated ribbing as a neck treatment, since I have that at the bottom hem, and plan to use it for the sleeve cuffs. Shaping necklines is still something that I don't feel confident in, and which I have trouble visualizing. Let's hope it turns out okay. I'm not afraid to frog whatever I do, if it doesn't come out the way I'd like. However, I am a bit nervous about the initial shaping (before adding the ribbing), which I won't be able to undo once I cut the neck steeks. I think I'll go through other sweaters in the book to get a bit more perspective on the whole issue.

Thursday, May 11, 2006

Ingeborg is DONE!

Ingeborg Done

Ingeborg modeled, 1

Ingeborg modeled, 2
It was incredibly difficult to get a good modeled shot. I think there's something wonky with the camera, in that I couldn't get it to focus well when using the timer. Hopefully these are good enough.


pattern - Ingeborg, from Dale of Norway book 126 (smallest size)
yarn - Brown Sheep Naturespun sport
pattern alterations - I ignored row gauge, because you can with this pattern. (Just knit to the length you like, and pay close attention to sleeve increases.) I used steeks to shape the neckline, instead of knitting back and forth as the pattern tells you to do. I also eliminated the texture patterning on the hems, because I thought it might make the sweater look too busy. And I obviously opted to not do the lace edging, either.
what I'd do differently next time - I might consider doing the texture pattern on the hems next time. Maybe. I'll also make sure to bind off the shoulder stitches before steeking.
things I learned - I don't even know where to begin. I learned that blocking wires are helpful, but still don't take all the work out of blocking accurately. I learned that machine sewn steeks are very secure, and can be very flexible and stretchy when done correctly. I learned that advanced patterns like this might not tell you every detail, such as reminding you to pick up stitches for the button bands so that they overlap with the collar and hem. Perhaps most importantly, I learned that stuff like this really isn't brain surgery. This point was hammered home as I worked on hems last night while listening to an interview with a brain surgeon on Fresh Air.

I'm so overwhelmed right now that I feel like there are a few billion things I want to say but can't bring to mind. So... do you have any questions? Any photo requests? I'll leave it here, because I'm tired. I rushed to finish today so I can take Ingeborg to the knitting group tonight. But what I really want, now, is a nap.

Wednesday, May 10, 2006

SFCKAL week 13 update

  • Becki is almost done! Actually, I wonder if she's done by now. Can't wait to see it modeled!
  • Lola is also almost done. In fact, just ditto everything I said about Becki's progress.
  • TJ has a very informative entry on shaping and armholes/sleeves. We're knitting the same sweater (Pullover with Vertical Stripes - though her version is a cardigan) and are at about the same place, too. How exciting! Her post does a good job of demonstrating a neat design feature on our sweaters, so check it out. And, uh, consider this my KAL update, too. I knit about a row today. TJ - wanna see if we can work it out so we finish on the same day? ;-)

I'm hoping for a finished Ingeborg post tomorrow or Friday. All the bands are knit, all the ends (except those from tacking down facings and bands) are woven in, and it's sooo close.

Tuesday, May 09, 2006

It's more fun when I don't look up the correct spelling. (Sockapaloooza!)

I got wonderful things in the mail yesterday. (No, I don't mean the student loan bill.) My socks are here!

Kate in North Carolina knit me Koigu Pomamatomitimitotious (err, you know what I mean) socks! I love the greens and browns, and the socks feel so wonderful. They felt especially nice when I first put them on yesterday. It was warm outside, but chilly in the house, and the warm, soft Koigu felt absolutely amazing on my iceblock feet.

Sockapalooza_May8


Kate also sent me dark chocolate with cherries and almonds in it, which makes me very happy.

So, two Sockapaloozas, and two pairs of Koigu socks. Good deal. As a bonus, I really love the Potatumumus, but know from looking at the pattern and reading around that they can be a pain at times to actually knit. Now that I have my own pair, I can put off knitting another pair for myself until I feel in the mood to knit socks that require more attention than I'm usually willing to devote to socks. (Remember my list from a month or two ago about ideal sock patterns: easily divides onto 4 needles, short but non-boring pattern repeats, easily memorized, easy to spot mistakes immediately, etc.? Pomatomtoms won't fly while I'm still feeling that picky.)

Thanks, Kate! You've been a super sock pal, and I absolutely love my Mopopatomapusses!

On a completely unrelated administrative note, I'm probably going to be doing some futzing around with photos on the blog. Things shouldn't look any different, but I'll just be shuffling around where some photos are hosted to preserve space for my better knitting photos in the main Flickr account. The only reason I'm mentioning this is that this may make some old posts appear as new posts in Bloglines. If that sort of thing bothers you, there is an option under "edit setting" for each blog you subscribe to, telling Bloglines to ignore edits to posts. I don't tend to edit to add content, so that setting won't be a problem with this blog.

Monday, May 08, 2006

Ingeborg quickie

No, she's not done. I only had so much patience for stockinette borders this weekend. Things weren't helped by the fact that I had to start the button band twice. More details on that when I finish for real. Here's how the sweater looks as of this morning:

Ingeborg, May 8, 2006


One button band and several hours of finishing to go. I even bought buttons, so I really have everything I need now.

Wednesday, May 03, 2006

in which she goes on at great length about Ingeborg finishing (some pics!)

I might as well post some Ingeborg progress today, as the camera may be up north for the next couple of days.

The Ingeborg finishing has already been quite an educational experience. I had left the neck stitches live, instead of binding off, because it seemed that would be easier. I could just do a 3 needle bindoff later, right? Well, yes, in theory. In practice, sleeve steeks don't land perfectly centered, and you don't end up with the same exact number of stitches to bind off together on the front and back of the shoulder on either side. I could have done a 3 needle bindoff with some fudging, but I ended up binding off those stitches and seaming the shoulder, anyway. Truthfully, it would have been easier if I'd just bound off those stitches before steeking. Oh, well. A lesson for next time, I suppose. For fun, here is a (wrong side) photo of Ingeborg after all the steeks were cut, but before just about anything else was done:

Ingeborg, inside out, May 3, 2006


As you can see, I had to transfer the live shoulder stitches to four separate circs, since the steeks were already cut. It was a... process.

Unfortunately, the pattern leaves one a bit in the dark as to how to actually do the seaming. It refers you to page 1 of the book for seaming instructions. Unfortunately, those seaming instructions consist of one smallish black and white photo, with no caption or instructions. It looks kind of like they're suggesting to whip stitch the pieces together from the right side, leaving the yarn you're sewing with completely exposed. That's not what I'm doing. Carol suggested basting the sleeve to the arm, then either machine sewing it in or backstitch them in. I think she said from the wrong side, which would make sense for that technique, I suppose. (Bonus trivia: I couldn't think of the word "backstitch", but remember I saw the term for it on Wendy Johnson's blog earlier today when searching for info., and just did another search so I could find that blog entry and get the word. My brain is a sieve!) Advice I've seen elsewhere suggests knitting it together from the right side (as in the Dale book), but to do it the way you'd sew in any sleeve, with a mattress stitch. Actually, I'm not sure if it's still called mattress stitch if you're working with knitted fabric in two different orientations, but if you've seamed before, you know what I'm talking about.

I played with a few of these techniques, and I think the one I'm going to go with is the mattress stitch. I've done it before, and there's no reason it shouldn't work here, right? I also think it looked nicest of the techniques I tried. That may be because I'm so inexperienced at sewing that it's the only technique I did competently.

After settling on a technique comes the issue of how to get the sleeve to lineup properly. Last night I wove in all the ends on the sleeves and body, except for a few that I'll be able to hide more easily once I do the button band. That cleaned my slate a lot, which was nice. (I also tacked down the hems on the sleeves, since I had the time, but not the concentration to start playing around with seaming techniques.) Some may call yesterday's Ingeborg finishing activities procrastination, but I call in preparation. I'm about to do the hardest part, and the more finished I can make the rest of the sweater before digging in, the easier it will be to concentrate just on this.

I tried pinning the sleeve to the body, but ya know, that can be wonky. That's what I always do, but for some reason, it just seemed to be more of a pain than usual here. Instead, I decided to use a method that involved no sharp, pointy things. I used scrap yarn to tie the body to the sleeve at three points - the bottom of the sleeve, the top of the sleeve, and the center of the side of the sleeve I'd start on. I'm really happy with this. T-pins slide around, poke me, and tend to distort the fabric. I'm happy with where I am, but find this overall process fairly stressful. I may leave the actual seaming until tomorrow. When I'm in the mood for seaming, I actually enjoy it. I'm not in the mood today.

Ingeborg - attaching sleeve

SFCKAL non-update; other colorwork stuff

No SFCKAL updates this week! At least none that have been blogged about. So, well, I guess that's the knitalong update for the week? (I actually knit about 2.5 rows on the Vertical Stripes sweater, but not much to see or discuss there. More progress when Ingeborg is DONE.)

Thanks for all the comments about the bag! I thought it would be appropriate to discuss evenness in stranded colorwork, since I've received several comments about that in recent history. First of all, you must know that when I first started to learn the technique, I asked a couple of more experienced knitters how their fair isle knitting looked so nice and even. The answers were basically "practice", "blocking", and "the photos lie". Those are my answers, too. Seriously, your technique will improve with time, blocking is the closest thing to magic you'll ever find in knitting, and photos rarely capture most of the puckering or unevenness unless you really try. I'll add two more explanations for why the bag turned out so well:
  1. With Komi patterns, you're never stranding across more than 5 stitches. It's usually 1, 3, or 5, with every third row being 3 of one color, then 3 of the other color, the whole way. This certainly helps keep things even and un-puckered.
  2. I've found that knitting at a really tight gauge (much tighter than what you'd usually do for that yarn) makes stranded colorwork stay a lot more even. I'm not quite sure what it is about this that helps, but I think it has something to do with the added stability and stiffness of both the fabric that's already been knitted and the live stitches on the needles. Things are less likely to shift around, which keeps it all under control. And I think having control of what your fabric and live stitches are up to is key to a nice stranded colorwork fabric.
While on the subject of pretty colorful things, I must link you to something special. This winter, I sent my friend Rebecca the leftover yarn from my Nordic mittens so she could knit a pair of her own. (She sent me Koigu in return!) She ended up using black for the main motif color, as I didn't have enough leftover of that, and she wanted black anyway. It turns out that she got one of the skeins of black Naturespun Sport that Brown Sheep accidentally sent to Alpaca Fleece instead of a cone of the same yarn for my Ingeborg. So her mittens are siblings to my mittens, and cousins to Ingeborg. How cool is that? Anyway, she recently finished her gorgeous mittens, and you all should click here to see them.

For the record, Rebecca was the first person I ever saw doing stranded knitting, when she did colorwork mittens in college. She also taught me important things, like how to un-knit stitches to fix mistakes. So she gets a lot of credit for inspiring and helping me when I was a fledgling knitter, with my Red Heart and Wool Ease. ;-)

Monday, May 01, 2006

all done with the bag

Komi Bag - done!


colorwork pattern - pattern 20, from Knitting Marvelous Mittens, plus a couple of extra stripes on the side
bag pattern - my own
yarn - Patons Classic Merino (Don't ask for the exact colors, as I got rid of the ball bands long ago.) I'm pretty sure I used well under 1/2 a skein of each. (It comes in 100 gram, ~220 yard skeins.)
needles - size 3 DPNs (yes, bulletproof gauge)

My friend Carol helped me with the lining today. (Okay, truth be told, she sewed the lining for me today. My helping consisted of standing around and watching, for the most part. Though I did sew the lining in on my own.) I know that at least one person was interested in the pattern. Since I used a colorwork pattern straight out of a book, and don't have a good way to share charts anyway, I'll leave it up to you to find a colorwork pattern you like. But I'll give you the basic bag recipe.

  • Cast on 96 stitches (or # you need) using a provisional cast on.
  • Join in the round and knit several (I think I did 6) rows in the background color before starting the colorwork pattern. I highly suggest either using a pattern that has stripes at the sides (such as the patterns in Knitting Marvelous Mittens), or adding in your own stripes, to create a faux seam. This will give some perceived shape to the bag. I also knit these stitches very tightly, not really paying attention to stranding tension. Because it was alternating stripes, this didn't cause problems, but instead helped keep the corners tight, which helps the bag stay relatively flat. Just make sure to calculate the seam stitches into your stitch count before you cast on.
  • When the bag is a bit shorter (maybe 1" or so) than the length you desire, switch back to straight stockinette in the background color. Knit until the bag is the length you like, then put the live stitches at the top on scrap yarn.
  • Block the bag. This will help with stitch evenness, and help the ends to lie flatter for your finishing work.
  • Unravel the provisional cast on while slipping those stitches onto your DPNs. I found it easier to slip those stitches onto slightly smaller needles.
  • Close up the bottom of the bag using a 3 needle bindoff. (Remember to do this inside out!)
  • Put the live stitches at the top back on your needles.
  • Knit attached icord. You'll do this in two separate sections. Start at one stitch past the center side stitch at one seam, and continue through the center stitch of the seam on the other side. Then continue knitting regular icord for a good while. (Whatever length you like.) Do the other half of the bag the same way. You should have icord edging around the entire top of the bag, with icord handles hanging from each side of the bag.
  • Sew the end of one of the icord straps to the other side of the bag. Take the icord strap that starts at that other end, and twist it around the attached strap until it's as twisty as you like, then sew it in on the other side. Futz with the twisting until it looks nice. (Yes, futz is a technical knitting term.)
  • finish stuff up - weave in ends, sew and attach a lining if you like, etc. You may want to steam the top to keep it non-curly, though I haven't had a problem with that yet on my bag.


I recommend doing your bag at a really tight gauge for whatever yarn you choose. I actually haven't measured my gauge, but on my swatch I was just under 7 stitches per inch, in a worsted weight yarn, using size 3 needles. I think a tight, dense fabric is nice, even if you line your bag and don't have to rely on the knitted fabric to hold the bag contents. It looks nice, and will hold up better to wear.

Did I forget anything? I hope not, but let me know if you have any questions.

By the way, the real reason for my trip to Carol's wasn't the bag. It was to do this:
Ingeborg - cutting steeks!